Update 3-1-18: the killyourcactusnow site has been shut down in favor of a new and improved site http://howtokillcactus.com, with even better information, photos, and videos.
Many have asked questions about how to employ my “Kactus Kicker” cactus eradication tool. Below are some photos I obtained in early December, 2012, while towing two of them behind my antique Farmall-H tractor on relatively flat and smooth pasture land. Figure 1 is a picture of what I was cleaning up: a pasture full of weeds, ground vine debris, and regrowth of cactus from neglected follow-up.
I shredded, then went back and “dragged” the cactus and the shredding-debris cactus pieces. Figure 2 is what it looked like when I was done. Figure 3 is what typical cactus debris looks like after dragging: loose from its roots, and crushed (you can see wrinkles on its surfaces). It has to be thoroughly crushed like this, or it will not bleed-out dry and die before it re-roots. In that case, all you are doing is spreading it.
Sorry, I do not have any video. But I will acquire some, and post it here, as soon as I can.
Earlier articles posted here include one dated 11-1-12 “About the Kactus Kicker”, and one dated 12-28-12 “Latest Production Version of the Kactus Kicker”. The first concerns how to handle and transport the tool; the second describes the differences between the current version and the earlier versions depicted on http://www.txideafarm.com. These are differences of implementation-only, not function.
The bigger, tougher snout on the current version requires a separate prybar to lift up the tool and set it on its rear edge. However, it is good for much rougher country. The same is true of the larger “barge front” wedging surfaces on the current version.
It is also possible to pull one tool behind a shredder, even with an under-powered tractor like mine. I have done that, although I have no photos of that to show here. At 8 feet, the tool is wider than most drag shredders (6 to 6.5 feet). I would hitch the tow bridle to a trailer ball welded to the aft structure of the shredder, or to a short tow chain hitched to the aft edge or structure of the shredder (what I do).
It does not make much sense to cut a far-wider swath with the cactus tools than with the shredder. Really powerful tractors could pull a shredder and up-to-three tools. I would arrange these in a series train, if I were to do this (with my tractor, I cannot pull more than one tool behind my shredder).
That would require nothing more than welding a trailer hitch ball to the aft center upper surface of each tool. Do not bolt it through: projections into the crushing volume beneath cause debris “baling” due to extra friction effects. That volume underneath the tool needs to remain quite smooth.

Figure 1 – Weeds, Ground Vines, and Some Regrowth-Cactus in the Pasture

Figure 2 – The Same Area After Shredding and Dragging Operations

Figure 3 – Typical Appearance of “Freshly-Drug” Cactus Debris
You can pull two tools behind an underpowered, worn-out antique like this Farmall-H shown in Figure 4, which had around 29 BHP when it was brand new way back in 1944. The risk is really overheating in warm weather, so watch your exhaust flapper valve. When you are at full power, it stands up straight, and you will overheat. If you see that happening, drop back to one tool, not two.

Figure 4 – 1944 Farmall-H Hitched Up to Two Cactus Tools
Pulling two tools side-by-side cuts a wider swath, so you get the job done quicker. The way I do this is depicted in Figure 5, with the white-painted tow bar bolted to my tractor’s drawbar assembly. That tow bar needs to be tough and well-braced, since the individual tool tow loads can exceed half a ton each. My tow bar is a piece of 3x3x1/4 square tube steel, with trailer balls added for tow points. It is pinned directly to my drag tool drawbar, and bolted in two places with angle braces to the drawbar support assembly. I tow one tool on a tow chain considerably aft of the other, and I turn into the rearmost tool, to avoid fouling chains on the tools. See Figure 5, and the close-up view of the mounting of the towbar, in Figure 6.

Figure 5 – Rear View of Tow Bar and Towed Tools Assembly

Figure 6 – Close-up of Tow Bar Mounting
I keep two tools out here on the farm: one is a production prototype for the “Kactus Kicker” offered for sale, the other is my original discovery prototype, which doesn’t resemble the production model so very much. For one thing, it has no “barge front”, since I have no immobile rocky outcrops. For another, the snout and ballast are different. But it functions the same way. Figure 7 shows the discovery prototype hitched close on the left, and the production prototype hitched trailing far behind on an ordinary tow chain. This is suitable for right turns only. For left turns, the left tool must trail behind on the tow chain. Figure 8 shows the hook connection of tow chain to the tool’s tow bridle.

Figure 7 – The two Prototypes as Hitched for Right Turns

Figure 8 – Hitching a Tow Bridle to an Ordinary Tow Chain
My pasture was full of tumbleweeds from the recent severe drought conditions, and a woody, ground-hugging vine. That vine “balls up” into a wad of debris the same way that ordinary weeds will “ball up” on a piece of barbed wire debris. This “bale” of debris lifts the tool up off the ground. Off the ground, it is not crushing cactus, so you have to stop and remove the debris. The following photos show how to do that easily and safely.
The near tool (of a towed pair) has its bridle tow loop hooked directly over your trailer ball or pintle hook. My nearer tool is the discovery prototype, not the production prototype, but the tow bridles hitch exactly the same way. You have to stop, and back up about 2 feet to slack the tow chains. Then you may simply unhitch the tool and pry it up onto its back edge, and prop it there with a piece of angle iron. For the discovery prototype, the snout is all the prybar I need to stay under 50-pound manual loads (this farm work, these are not OSHA 30 pound loads!). See Figures 9, 10, and 11. If you rake the “bales” out to the side you have already done, or out behind the tool, you won’t hit (and re-accumulate) this debris on the next pass.

Figure 9 – Slack Tow Bridle to Unhitch

Figure 10 -- Pry It Up and Prop It There, Then Hoe Out The “Bales” of Debris
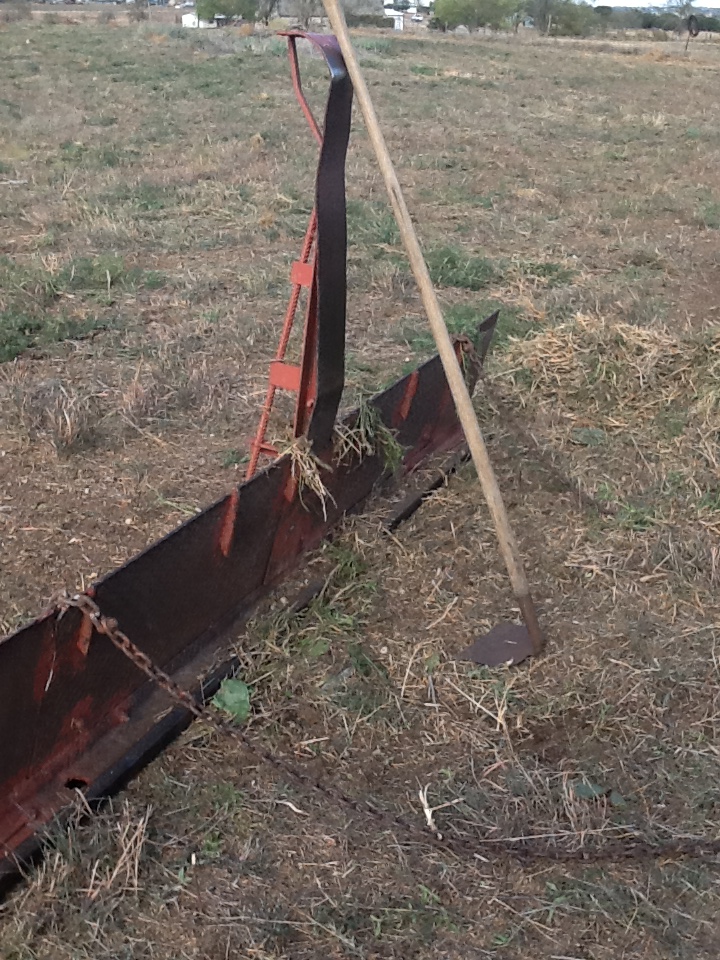
Figure 11 -- Rake the Bales Out to the Side You Have Already Done, or (Better) Behind
The far tool of a towed pair has its tow bridle hooked to an ordinary tow chain. When you back up two feet to slack the chains, just unhitch this tow chain-tow bridle joint as shown in Figure 12. Then insert an approximately 6-foot steel pry bar into the snout as shown in Figure 13. Pry the tool up onto its back edge and prop it there with a piece of angle, as shown in Figure 14. This allows you to hoe out the “bales” of debris to the sides and behind the tool, as in Figure 15.

Figure 12 – Unhitching the Far Tool in a Towed Pair

Figure 13 – Inserting the Required Pry Bar into the Tool’s Snout Assembly

Figure 14 – Pry the Tool Up Onto its Rear Edge and Prop It There

Figure 15 – Hoe Out the “Bales” of Debris to the Sides and Around to the Rear
This same pry-up procedure is a nice way to store the “Kactus Kicker” out in the pasture without killing all the grass underneath it. I leave it propped up, as in Figure 16. The skids underneath the leading edge make wonderful reliable prop-up points. You need a piece of angle about 26 inches long for this.

Figure 16 – Storing the “Kactus Kicker” Propped Up Onto Its Rear Edge
Other Related Articles on this Site (date highlighted on this one)
Date.....…title/content
...................turnkey site for info, photos, videos, purchases
2-9-17....Time Lapse Proof It Works
............watch cactus being crushed and composted
7-30-15......New Cactus Tool Website...................turnkey site for info, photos, videos, purchases
1-8-15……Kactus Kicker Development
………………production
prototype & 1st production article
1-8-14……Kactus Kicker: Recent Progress
…………..….testing
a revised wheeled design (experimental)
10-12-13..Construction of the Tool
………………building
a “Kactus Kicker” (plain tool)
5-19-13…….Loading Steel Safely
……………….transport
and storage of materials
12-19-12…Using the Cactus Tool or Tools
……………...how
the tool is employed (applies to any model)
11-1-12….About the Kactus Kicker
..…………….painting
and rigging finished tools (plain tool)
12-28-11..Latest Production Version
………………new bigger snout and barge front (plain tool)
No comments:
Post a Comment